Showing posts with label tutorials. Show all posts

09 September 2021

Foiling on vellum with the Heidi swap minc machine

Hi there! today I will be sharing with you all how to foil on vellum using the minc machine.
It is good to note that when i looked for a good vellum to foil the Heidi Swapp Minc vellum actually was the easiest to use. some of the vellums I found were too porous or so thin that the toner seemed to crack when I  foiled it. 
In this tutorial i used the HS vellum.

1- Open the software program that you will use to print on the vellum.


2- Select your design. I am using My valentine has fur bundle from designbundles.net


3- Select your design and resize.


4- Once resized select the print icon.


5- A print window will pop up. Click on the preferences.


6- Select vellum on the paper type and then make sure that the high print quality is set.. click ok and print.


7- You design is printed onto the vellum.


8- Place the foil over the vellum and place into a transfer folder.


9- Turn on the Heidi swap minc machine. Set to number 2 for vellum and run the transfer folder through.


10- Your design is foiled.


06 July 2021

How to use PSD (photoshop) files in the Silhouette Alta 3D software.

Hi there! today I will share how to use a PDF file with your silhouette Alta 3d printer.
To do this technique you will need software that can access a PDF file and save as a SVG file. I am using Silhouette studio business edition. Business edition is not free but you can usually pick the upgrade on special at many sites like swing design online. 

1- Open Adobe Photoshop. I am using photoshop elements.(you do not need to full version ) Click on the open icon.


2- Select your PSD file. Open it.


3- In the layers tab, select all the layers you do not want to use in your 3D print file. Then delete them.


4- Move the layer you have kept to the middle of your design space.


5- Go to File - save as.


6- When you save the file, save as a JPEG file, not a PSD file.


7- Go and load Silhouette Studio software. (free edition) Click on the open folder icon.


8-Your JPEG will load onto your design space. Click on the trace icon.


9- Trace your design.


10- You may need to trace the parts several times and combine them to replicate your design.


11- Delete the JPEG and only have your traced image in your design space.


12- Go to File - Save as - Save to hard drive.


13- Open the Silhouette Alta 3D software. Click on the open folder icon.


14- Fine your studio file and open.


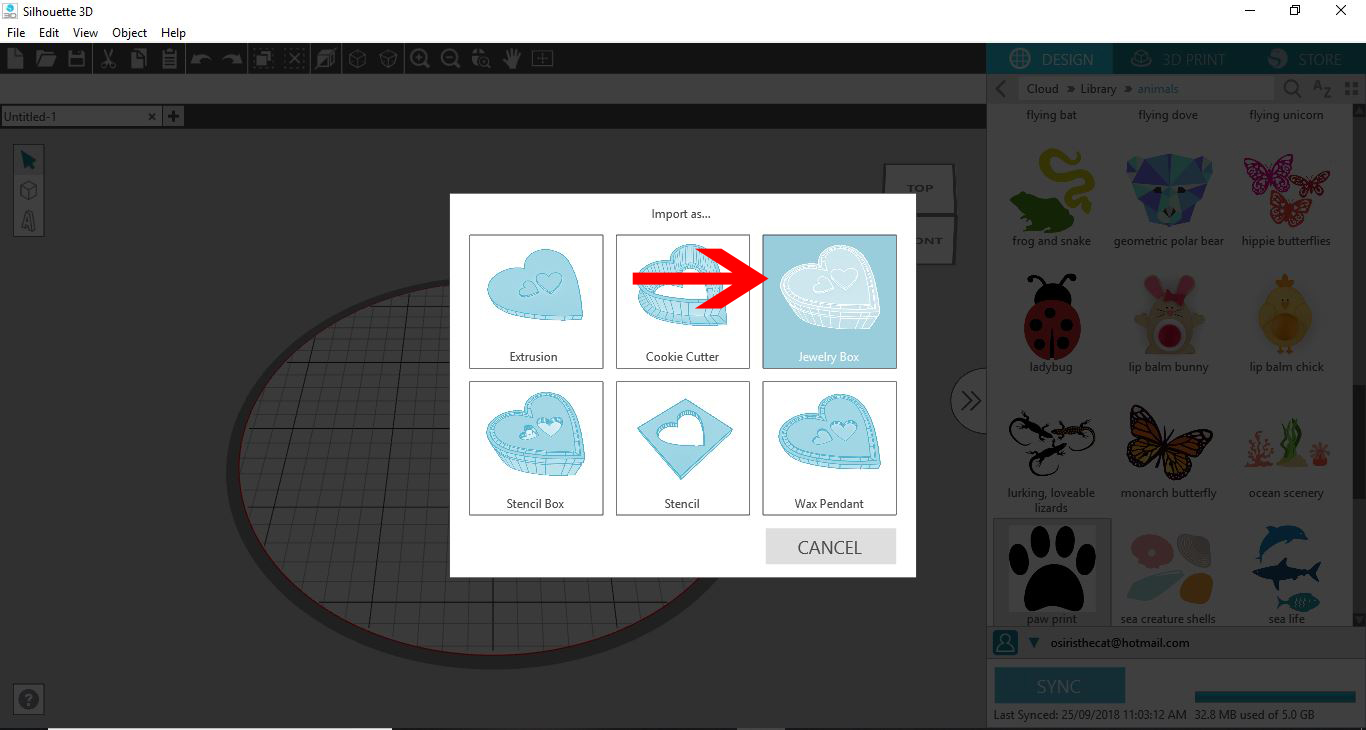
15- A new window will appear. At this point you can choose what you would like to convert the file to. I will be creating a jewelry box.


16- Your file will convert and At this point you can either ungroup or add /remove from your design. When you are happy you can click on 3D print.


17- Your design will slice and you can print.


18- Your design is printed.


24 October 2020

Creating a basic jewelry box with the Silhouette Alta.

Hi there everyone!! today I have a tutorial for you on how to create a basic jewelry box in the silhouette Alta software.

Some of there steps are super simple and with the right file/svg you can design something you can further paint and use for any trinkets.

1- Open the Silhouette Alta software. Click on the library tab on the right.


2- Click on the library.


3- Select a basic design. Double click on the design.


4- A new window will appear. Click on the jewelry box icon.


5- Your 2D design will appear as a 3D jewelry box.


6-  You can adjust the size of the box using the nodes. You can even adjust the height as well.


7-  To adjust individual parts of the box you need to right click and ungroup the design.


8- You can separate the lid from the base.


9- When you click on the 3D print icon, you will see that the printer wants to print the design in many parts. This is great if you would want to have several different colours and to glue them together. If you want them all to print as one file you will need to group the parts in the design area.


10- Select all the parts and right click then group.


11- and now you can see that the printer will print as one part.


12-  If you would like to make the most of your design, you can add a base to part of your box to make a separate compartment. Go to the shape icon and select the cube.


13- Place the cube in the design,


14- Adjust the height of the cube to make to thickness the same as the rest of the base area.


15- Select the new base and the original box and right click then group.


16- You can now print the box.


10 April 2020

Heidi Swapp Minc foiling series- Using microsoft word to foil text.

Hi there everyone!!!

Today In the Foiling series I will be sharing with you how to use Microsoft word to create text to foil.
There are lots of software programs out there to use for printing text. One that most of us have on our PC is Microsoft word. This program is good to create basic text to foil.
 It is good to note tho that with a lot of Microsoft programs the software will automatically change your print settings to eco mode. When foiling, you will need to remember to change that setting back to best print setting so you have the amount of toner printed that will work well for foiling.

This tutorial will show you how to crate basic text and foil.


1- Open Microsoft word. To change the font select the font dropdown menu.


2-Select your font. I am using Broomstick font from fontbundles.net


3- Type your text. Next change the size of your font to your needs.


4- Click file to take you to the print screen.


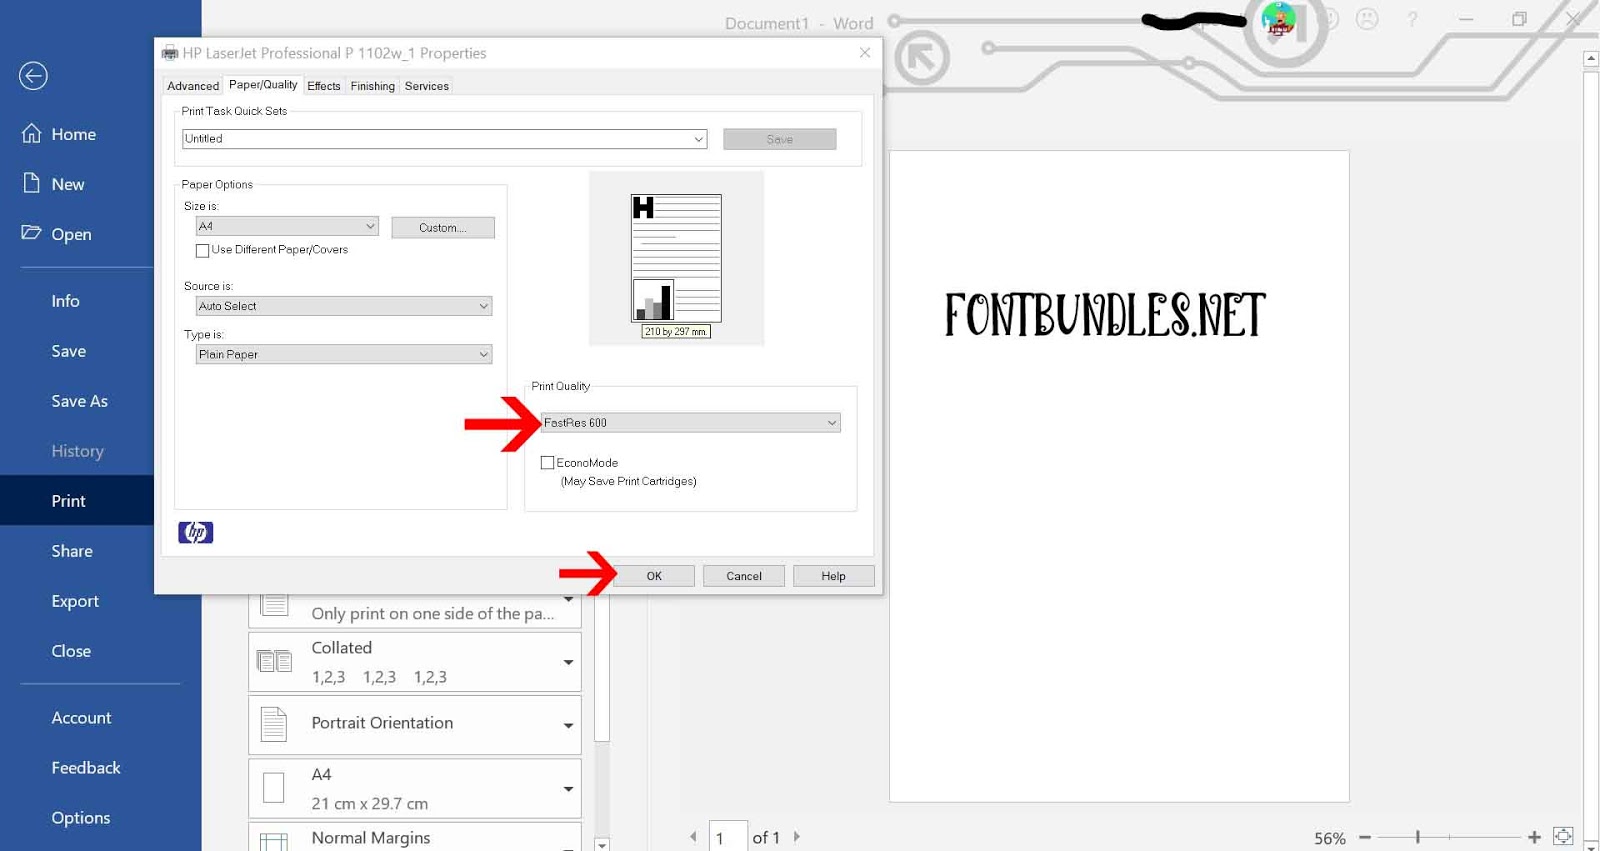
5- Once your printer is selected, click on printer properties.


6- Make sure your printer is on the highest quality setting so the most toner will be printed. Click OK.


7- Print your text onto your media.


8- Place the card into the Heidi Swapp minc transfer folder with a piece of foil over the printed design.


9- Turn on your minc and set to 3. Let the minc heat up until it beeps. Place the folder into the machine. It will slowly feed through, heating up the toner and letting it adhere to the foil.


10- Once the foil has cooled, slowly peel it off your design. The foil will have adhered to the toner creating a foiled finish.