Hi there!
Today I have a tutorial on how to use a SVG file in your alta 3D printer to make a stencil box. THe software does a lot of the work for you as long as you have a SVG file ready to go .
You will need both silhouette studio and the 3d printer software installed to create your design.
1- Open up Silhouette studio software. Click on the open folder icon.
2- Find your SVG file. Open.
3- Your design will open in the software. Resize to your needs. I am using Unicorn SVG, unicorn princess file from designbundles.net
4- Save as a studio file.
5- Open the silhouette 3D alta software.
6- Open your studio file.
7- A new window will appear. click on the stencil box option.
8- The software will convert your SVG file you saves as a studio file to a 3D stencil box.
9- Once you have your box and resized to your needs, you can also ungroup the design. Right click and select ungroup.
10- By ungrouping the design you can then separate each part and print in different coloured filament, then adhere together once all printed. If you want to print all together, make sure the parts are grouped so they will print as one.
11- Select the base of your design and select the print icon.
12- Once the base is printed, click on the lid option on the bottom of your screen and then print.
13- The finished lid.
14- The lid will fit the base to create the stencil box.
24 January 2020
20 August 2019
How to create a basic stencil in Silhouette Alta.
Hi there everyone!
Stencils are a great source of technique. You can use them to emboss, paint and stencil.
You can easily make your own basic stencil using the silhouette alta.
Below are the steps to do this.
1- Open Silhouette Alta software. Click on the right side tab.
2- Click on the library folder.
3- Find a folder where you may have background files.
4- Double click on your image.
5- A new window will appear. Click on the stencil option.
6- Your design will appear as a stencil. With this particular design there are gaps from the edge to the design which need to be joined to create a whole stencil.
7- Click on the shape option. Then click on the cube.
8- Flatten the cube to the same height as the stencil.
9- Resize the flattened cube to a long thin rectangle. Place on the edge of your stencil to join the middle of the design to the edge.
10- Right click on the rectangle and duplicate.
11- Move the duplicated rectangle to the right joining the middle to the edge.
12- Right click and duplicate again.
13- Rotate then shorten and place across the top of the stencil to join the edge with the middle stencil design.
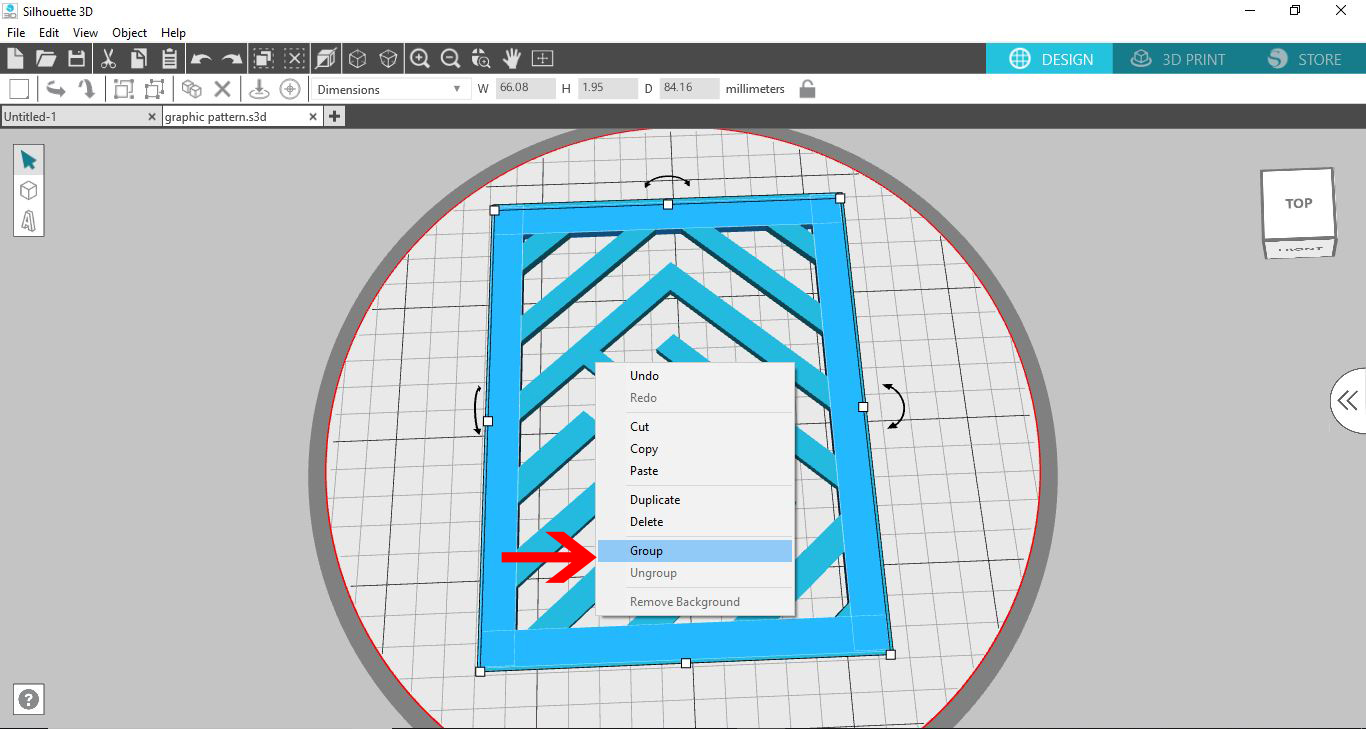
14- Repeat again to the bottom of your design. then click on the select all icon.
15- Right click and group. By grouping the pieces the printer will print as one design not several separate small ones.
16- Click on 3D print and then select your print options and print.
17- Your finished design can now be used as a stencil with paint or spray. You can also use these stencils through a manual die cutting machine to dry emboss patterns.
Stencils are a great source of technique. You can use them to emboss, paint and stencil.
You can easily make your own basic stencil using the silhouette alta.
Below are the steps to do this.
1- Open Silhouette Alta software. Click on the right side tab.
2- Click on the library folder.
3- Find a folder where you may have background files.
4- Double click on your image.
5- A new window will appear. Click on the stencil option.
6- Your design will appear as a stencil. With this particular design there are gaps from the edge to the design which need to be joined to create a whole stencil.
7- Click on the shape option. Then click on the cube.
8- Flatten the cube to the same height as the stencil.
9- Resize the flattened cube to a long thin rectangle. Place on the edge of your stencil to join the middle of the design to the edge.
10- Right click on the rectangle and duplicate.
11- Move the duplicated rectangle to the right joining the middle to the edge.
12- Right click and duplicate again.
13- Rotate then shorten and place across the top of the stencil to join the edge with the middle stencil design.
14- Repeat again to the bottom of your design. then click on the select all icon.
15- Right click and group. By grouping the pieces the printer will print as one design not several separate small ones.
16- Click on 3D print and then select your print options and print.
17- Your finished design can now be used as a stencil with paint or spray. You can also use these stencils through a manual die cutting machine to dry emboss patterns.
24 July 2019
Create a key ring using a SVG file in Silhouette Alta software.
You can create many different things in the new silhouette Alta.
Below is a quick tutorial on how to make a keyring.
Once you have printed your keyring you can paint with acrylic paints and then spray with clear paint to seal it.
1- Open Silhouette Studio software (free edition). Click on the open file icon.
2- Find your SVG file and click open. I am using Pineapple SVG from designbundles.net
3- The pineapple SVG will appear. Select the one you would like to use.
4- Right click and copy.
5- Go to a new file and right click and paste.
6- with your design selected, click the offset icon.
7- Click on offset.
8- Adjust the offset size and click apply.
9- Select everything and click make compound path.
10- You will now see all the "cut" lines
11- We actually need to release the whole compound path. So right click and release compound path.
12- By making the compound path and then releasing it, we can be assured that all parts are separate.
13- Go to File - Save as - Save to hard drive. Make sure you save as a .studio file.
14- Open the Silhouette Alta software, click on the open icon.
15- Select your studio file and open.
16- A new window will appear. Click on extrusion.
17- The pineapple will now be on the design area.
18- Click on the shape icon and then the tube shape.
19- Change the height of the tube to the same height as the pineapple. Move to the top of the design and then over lap some of the tube onto the pineapple.
20- Click on select all, then right click and group. This will join the tube and pineapple together to make one design (a little like weld on studio software) Next click 3D print.
21- As you can see the design is now one print. Click the quality type and then click on print.
Below is a quick tutorial on how to make a keyring.
Once you have printed your keyring you can paint with acrylic paints and then spray with clear paint to seal it.
1- Open Silhouette Studio software (free edition). Click on the open file icon.
2- Find your SVG file and click open. I am using Pineapple SVG from designbundles.net
3- The pineapple SVG will appear. Select the one you would like to use.
4- Right click and copy.
5- Go to a new file and right click and paste.
6- with your design selected, click the offset icon.
7- Click on offset.
8- Adjust the offset size and click apply.
9- Select everything and click make compound path.
10- You will now see all the "cut" lines
11- We actually need to release the whole compound path. So right click and release compound path.
12- By making the compound path and then releasing it, we can be assured that all parts are separate.
13- Go to File - Save as - Save to hard drive. Make sure you save as a .studio file.
14- Open the Silhouette Alta software, click on the open icon.
15- Select your studio file and open.
16- A new window will appear. Click on extrusion.
17- The pineapple will now be on the design area.
18- Click on the shape icon and then the tube shape.
19- Change the height of the tube to the same height as the pineapple. Move to the top of the design and then over lap some of the tube onto the pineapple.
20- Click on select all, then right click and group. This will join the tube and pineapple together to make one design (a little like weld on studio software) Next click 3D print.
21- As you can see the design is now one print. Click the quality type and then click on print.
Subscribe to:
Posts (Atom)