30 December 2020

Foiling with multiple colors using the Heidi swap minc

Hi there everyone!!!! 
Today I have a tutorial for you to show how to foil in multiple colours.
The concept is quite easy, as long as you use baking paper to stop the toner from your design sticking to your plastic folder.

Open the software you want to use to print your design to foil. I am using Silhouette studio. You can download it for free online.  Click on the open icon.


2- Select your design. I am using Valentine subway art from designbundles.net


3- Select the design. Click on the fill icon.


4- Change your design all to black.


5- Next select the line style icon. Select the line color and change to black also.


6- Click on the print icon. a new window will appear. Click onto preferences.


7- Make sure the print settings are to the highest quality possible. Click ok and then print.


 8- Print your design with your laser printer.


9- Place the colored foil over the parts you would like to have that color. Place a piece of baking paper over the card and foil, then place into the transfer folder. The baking paper will stop the toner adhering to the transfer folder.


10-Run through the minc machine in setting 3.


11- Remove the foil.


12- Repeat the above steps and place the next colored foil over the parts you need gold. Place the baking paper over the top and then in the transfer folder.


13- Run through the minc machine again. Remove the baking paper and the gold foil.


14- Place the next color foil over your design. As this is the last color I am covering the whole design. The foil will not stick to the already foiled parts. Run through the minc on setting 3.


15- Remove out of the transfer folder and take foil off. your design is foiled.


24 October 2020

Creating a basic jewelry box with the Silhouette Alta.

Hi there everyone!! today I have a tutorial for you on how to create a basic jewelry box in the silhouette Alta software.

Some of there steps are super simple and with the right file/svg you can design something you can further paint and use for any trinkets.

1- Open the Silhouette Alta software. Click on the library tab on the right.


2- Click on the library.


3- Select a basic design. Double click on the design.


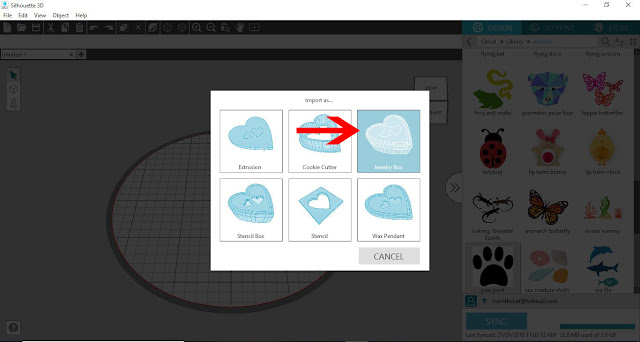
4- A new window will appear. Click on the jewelry box icon.


5- Your 2D design will appear as a 3D jewelry box.


6-  You can adjust the size of the box using the nodes. You can even adjust the height as well.


7-  To adjust individual parts of the box you need to right click and ungroup the design.


8- You can separate the lid from the base.


9- When you click on the 3D print icon, you will see that the printer wants to print the design in many parts. This is great if you would want to have several different colours and to glue them together. If you want them all to print as one file you will need to group the parts in the design area.


10- Select all the parts and right click then group.


11- and now you can see that the printer will print as one part.


12-  If you would like to make the most of your design, you can add a base to part of your box to make a separate compartment. Go to the shape icon and select the cube.


13- Place the cube in the design,


14- Adjust the height of the cube to make to thickness the same as the rest of the base area.


15- Select the new base and the original box and right click then group.


16- You can now print the box.


10 April 2020

Heidi Swapp Minc foiling series- Using microsoft word to foil text.

Hi there everyone!!!

Today In the Foiling series I will be sharing with you how to use Microsoft word to create text to foil.
There are lots of software programs out there to use for printing text. One that most of us have on our PC is Microsoft word. This program is good to create basic text to foil.
 It is good to note tho that with a lot of Microsoft programs the software will automatically change your print settings to eco mode. When foiling, you will need to remember to change that setting back to best print setting so you have the amount of toner printed that will work well for foiling.

This tutorial will show you how to crate basic text and foil.


1- Open Microsoft word. To change the font select the font dropdown menu.


2-Select your font. I am using Broomstick font from fontbundles.net


3- Type your text. Next change the size of your font to your needs.


4- Click file to take you to the print screen.


5- Once your printer is selected, click on printer properties.


6- Make sure your printer is on the highest quality setting so the most toner will be printed. Click OK.


7- Print your text onto your media.


8- Place the card into the Heidi Swapp minc transfer folder with a piece of foil over the printed design.


9- Turn on your minc and set to 3. Let the minc heat up until it beeps. Place the folder into the machine. It will slowly feed through, heating up the toner and letting it adhere to the foil.


10- Once the foil has cooled, slowly peel it off your design. The foil will have adhered to the toner creating a foiled finish.


02 April 2020

Heidi Swapp Minc Foiling tutorial series - Foiling Basics

Hi there everyone!

While the world is crazy outside and we are all stuck in our houses self isolating, I thought what better time than to start creating a series of tutorials on how to use your Heidi Swapp foiling machine.

I have had mine for several years and use it pretty much every week on many different projects. People seem to think that the Minc machine is mainly for foiling card and creating basic projects, but there is so much more you can use it for! Combine it with say a Silhouette Cameo or other cutting machine and the possibilities are limitless!!!

Today I will be showing you a little bit on the basics of the machine. What it is, how it works etc.
You can also check out a previous post I did a while back on the Minc machine HERE


The Heidi Swapp Minc Machine is a product that uses heat and toner with foil to create a beautiful foiled effect.


There are 2 types of foiling on the market. Heat reactive foil and toner reactive foil. The Heidi Swapp Minc uses the Toner reactive foil.
The 2 main brands of toner reactive foil are The Heidi Swapp Minc brand and Deco foil brand.


The other requirement for using the Heidi Swapp Minc machine is a laser printer. A mono laser printer is best, but a color laser can also be used.
Remember, if using a color laser printer, everything that you print will foil no matter what color you print in. The foil cannot distinguish between colors.
 There are many laser printers on the market which work great. From experience I have found that the genuine toner cartridges work better than compatible cartridges. This may be due to the quality of toner in the compatible ones may not be as good as the genuine ones. Keep this in mind when replacing the cartridges.

HP1102w laserjet

The media/cardstock you use is also a important factor when foiling. Especially with toner based foiling like the Heidi swapp minc.
To get a perfect foil you need the toner to "pool" on the surface of the cardstock/media you are using. You do not want to it get absorbed into the cardstock. Therefore the fibres need to be close together not apart or the toner will absorb into the fibres of your media/cardstock.


Think of the toner like glue. The toner will be printed onto the cardstock. The toner dries on the surface of the card. When you place foil over the toner/card and then place through the Heidi Swapp Minc machine it will reheat the toner to a liquid form. This will adhere to the foil and when you remove the foil sheet the foil will stick to the now dry toner.

If the toner has absorbed into the cardstock/media there is nothing for the foil to adhere to when you reheat through the Minc machine. Below is an example of what happens if the toner is absorbed way too much into the cardstock. You will get a uneven foiled effect. Heidi Swapp Minc foil used.


Cardstock which has a smooth surface work best. Brands like X-Pressit Blending card works really well as it is designed for copic markers to pool and blend on its surface, so the toner does the same. I have also had success foiling with Quill and Canson brands of cardstock.


The Heidi Swapp Minc machine has 5 settings. These are used to change the heat of the machine. Depending on what you are foiling will determine on what heat setting you use.


If you use a heat setting too low, the toner will not remelt and the foil will not stick. 
See below image.


If you use a setting too high the media you use may get damaged or the toner may overheat and absorb into your media. This can also lead to uneven foiling.

Here is a general guideline of what setting to use with different medias.
(Setting may vary due to the minc machine,media used and toner used)

Setting 1- Transfer Adhesives, thin vinyl.
Setting 2 - Glassine paper, clear overlays, vellum, lightweight coated paper, copy paper,
shiny sticker paper.
Setting 3 - Non coated papers, coated cardstock, some unloaded cardstock with tight fibres, 3mil laminating pouches.
Setting 4 - Uncoated cardstock, 5mil laminating pouches.
Setting 5- Chipboard.

Always do a sample test first before creating your whole project.

If you do everything correctly and still get black dots where the foil has not stuck, you could have an issue with dust or another outside contaminate. This could be something as small as the tiny particles of paper that are created when the manufacture plant cuts your cardstock into size.
See below image.


To avoid these issues, try to keep your foils in their original packaging, and keep your cardstock and different media in plastic zip lock bags. You can even go as far as to wipe your cardstock with a antistatic cloth to remove any dust particles that may be around.


The Heidi Swapp Minc machine will create amazing projects if the above steps are used.