28 June 2011
Delayed Tuesday Tutorial.
This week Tuesday tutorial will be a Thursday tutorial as i have been crook and not had the chance to sort one out yet,so stay tuned on Thursday.
23 June 2011
Zoes cub bag.
Zoe has just been invested into cub scouts. One of the things they are given is a fabric bag to carry their cub book etc in. Zoe asked me to create an ocean theme on her bag so i used genesis fabric dyes to tie dye her bag and then took several fabrics my making memories slice machine and the zootopia design card and created her ocean theme. Zoe wanted bling but all i had was hotfix swarovski crystals so the bag is now a very expensive cub bag!!!


A very quilty christmas.
Here is a quilt that i made for my mum.. It took me over 6 months to complete this quilt but it was so worth the look on my mums face when she got it.


21 June 2011
Tuesday Tutorial.....Paper flowers
Today i am going to share one of my favorite types of flowers. They are really simple to make but are very effective on scrapbook pages and cards.

to make these flowers you will need a Fiskars circle punch, brads( i used my i-top and made my own matching brads), a water spray bottle,patterned paper, and distress ink,stickles and perfect pearls...depending what effect you would like.
so firstly cut out five circles. i find that if you can use light to dark patterned paper it gives a better effect than all the same colour.

next put them in a pile with lightest on top to darkest and put a hole in the middle for your brad.


once your brad is through, start to crunch up your circles one at a time toward the middle and the brad.


when they are all crunched up, UN crunch them and do the same thing again but this time spray your circles each time with water to make them more pliable and easy to crunch up.

You will notice doing this the second time with water it gives you more texture.


pat off excess ink with paper towel

open up your circles carefully to create your flower and leave to dry.
Well i hope you have liked this quick tutorial on making flowers with circles.
18 June 2011
A couple ox xmas tags.
I have created these 2 xmas tags using Fiskars products some fancy pants paper and a bit of card. I got the idea from an issue of scrapbooks etc. last year. i think they look great to liven up some dull plain Xmas wrapping!
all you need it a fiskars trimmer, a scalloped circle punch ,circle punch and apron lace border punch. then a hole punch cardboard some Xmas paper and your imagination!

all you need it a fiskars trimmer, a scalloped circle punch ,circle punch and apron lace border punch. then a hole punch cardboard some Xmas paper and your imagination!

17 June 2011
Poppy loves VEGEMITE Yeah!!! she is a true Ozzie!!!
We gave Poppy her first taste of Vegemite on toast today and she just yummed it up! Yeah! i am glad she likes it...what Ozzie doesn't!!!


A Couple of cards.
I've been a busy gal and been getting my cards made up for next years birthdays. here are a few.
This card uses lawn fawn stamps fanciful frames and critters in the forest. and their new alphabet too. I coloured with copics.

This card uses the greetings farm digi stamp of Edward(from twilight) and the background is script stampin up . i coloured with copics and went all over Edward with copic clear glitter pen .

this card again with copics and hero arts cling stamps.
 Finally this card i used cc designs rainy day emma and basic grey paper. a fiskars in stitches border punch and sme prima flowers.

This card uses lawn fawn stamps fanciful frames and critters in the forest. and their new alphabet too. I coloured with copics.

This card uses the greetings farm digi stamp of Edward(from twilight) and the background is script stampin up . i coloured with copics and went all over Edward with copic clear glitter pen .

this card again with copics and hero arts cling stamps.


14 June 2011
Tuesday Tutorial......Poppies.
Today i am going to share with you how to make Poppies using your Fiskars tools.

You will need the following-
Coloured paper around 80-100gsm so it is a little stiff.
Fiskars round -n- round extra large circle squeeze punch
Fiskars round -n- round large circle squeeze punch
Fiskars May Flowers medium squeeze punch
Fiskars Bling extra Large Squeeze punch
Glue dots
Stapler
Ok . now lets get started.
Cut yourself 7 Red circles with your extra large fiskars circle punch.

Next fold each circle in a concertina shape back and forth.

Then you will need to cut a small slit along the middle edge of each circle in the same direction as the folds. approx 1-1.5cm

Next over lap the paper cut you made slightly so you have a slight curve. Staple. It will start to look like a petal now.

Glue dot four of the petals together slightly over lapping and then do the same with the other three. this will make your 2 layers of your poppy.
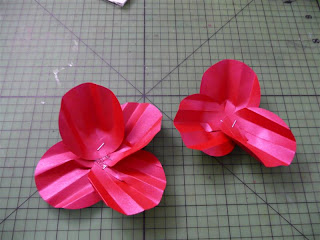
Once this is done place a glue dot on the centre of the four petal part and then place the three patal part on top. Try to alternate the leaves so there is no gaps.

Now we have to create the Poppies centre. Take your yellow paper and cut out 2 shapes with your Fiskars bling punch.

Glue the 2 on top of each other alternating the long strips so it will create the stamen. then place in the palm of your hand, take a end of a pencil and press. this will curve up the shape.

Do the same thing with the black card and the may flower Fiskars punch.


Place a glue dot and attach the black part to the yellow part to make the middle of your poppy.

Take another glue dot and glue the centre of your poppy to the petals.

You now have your poppy.
You could add leaves and even wire to make them for a vase but i have used mine for a pressy.
Tips to remember- you do not have to make them a specific size. if you want them bigger, you can use your shape express template and make really big ones and for the centre you can cut circles and then take your scissors and snip around the circle to create the same stamen like the Bling punch did.
11 June 2011
here is a cheeky little tutorial for saturday.... Rosettes.
Well i have been thinking that rosettes seem to be the "in" thing at the moment. With all the dies from Tim Holtz,my favorite things and Sizzix out there It can end up quite expensive and on top of that when you buy the die you are limited to 1 size.


Well i am going to share with you a cheaper way to make rosettes with only your Fiskars Trimmer,a Fiskars border punch.(i am using apron lace) a Fiskars circle punch (any circle punch will do) and a bone folder or well...anything to score lines will do.
Firstly you need to cut yourself a piece of patterned paper. 30cm x 4.5cm . then punch your border along one side.

Then take your trimmer and score in between each groove in the apron lace pattern. if you are using another punch score about 1cm apart or where the punch pattern starts each time.

Once scored, fold back and forth like a concertina.

stick the ends together on the fold so you have a circle.

Push the centre in(the side with no border punch)

Take a medium Fiskars circle pinch and cut a card circle. add glue and attach to the back of the rosette.

Get a large fiskars circle punch and punch out a card circle for the front. you can use any pattern or even a stamp to decorate the circle. In the past i have stamped 'to' and 'from' on the circle to create gift tags for parcels.

Punch some patterned paper for the ribbon effect or even use real ribbon and wrap your parcels with them

What a great way to create a rosette and save money by not purchasing the die to do this.
Remember any border punch will work, and also the larger the rosette the longer you will have to make the paper to get a full circle.

07 June 2011
Tuesday Tutorial... Using Fiskars Everywhere punch to create a window.
Today for Tuesday Tutorial I am showing you all how the New Fiskars Everywhere Punch works and how to line it up to create a fantastic Window card.
Here is the finished card.
 To create this card you will need the following.....
Fiskars Everywhere punch starter set. They are currently available at Spotlight or www.abiscraft.com.au
Fiskars Trimmer
Fiskars Scissors
Card-stock in brown and white (if using copic markers to colour use bleed proof card-stock)
Sizzix texture plate in brick pattern and a die cutting machine to run it through
Lawn fawn stamps. I have used critters in the burbs,critters in the forest,banneriffic, lunar lights,critters in the snow and fanciful frames.you can get them from www.lawnfawn.com (yes! I am loving lawn fawn at the moment!)
Copic markers to colour
memento tuxedo black in pad.
glue,glitter and glossy accents.
First step. Cut Your card to square 15cm x 30cm, score at the 15cm line to create your square card.

On the inside of your card pencil in lines at 7.5cm vertical and horizontal. This is your guide to cut your window evenly.

Start in the bottom right section of your card to create your first window. Use the guide lines on the Fiskars everywhere punch to get your square lined up with your pencil lines.use the 1st line in on the guide so when you cut there will be a gap. this will create the 'cross' section in the window.

Your first square is cut.

Turn the card upside down to put the cut square in the top left section. From now on we will be cutting the squares in a clockwise order.I have found by doing this i can get the squares the most even as you have the cut square on the left to use as a guide for the next punch.
Do the same as the step above. line up your square and punch.

Turn your card to make the last punched square to the top left section again and then follow the above steps and cut the 3rd square.

Finally turn your card again to make the last punched square to the top left and punch the final square.
You now have your window. If you are not 100 % give it a few goes on paper first to get the knack.

Here is your window card.

Next place your card into the brick texture folder and run through your die cutting machine. I had to do this twice to get the whole card embossed.

Once embossed trim off any card from the top or bottom that has not been embossed. i had to trim about 1/2 cm off the bottom to tidy the card up.
 The trimmed card.
 next cut a piece of white card-stock to fit inside the card for the background. I used express it blending card-stock as i will be using Copic markers to colour in.

Glue or double side tape the white card-stock into the inside of the card. Once you have done this close the card and with a pencil trace around where the window holes are. This will help you place your stamped images in the best position for maximum effect when the card is closed.

Stamp your images into the card. Ensure when the card is closed that you can see the important parts of the stamp to give the"looking through the window" effect. I have gone with lawn fawn stamps to create a Christmas theme. I really wanted to do an open fire with the Xmas tree but i cannot seem to get lawn fawn cozy Xmas stamps ANYWHERE!!! Never mind I did the best with what I had.
 Colour in with Copic markers (or any colouring medium), use glitter and glossy accents to add sparkle to the tree etc.

And there you have it... The finished card. Just like you were looking in on a cold Christmas night!
The Fiskars Everywhere Punch starter set comes with the square punch included. you can also get circle,scalloped square and scalloped circle as separate shapes. These extra shapes are interchangeable with your starter set. When i get my little hands on the other shapes i will put up some more tutorials for you using the different shapes.

Here is the finished card.

Fiskars Everywhere punch starter set. They are currently available at Spotlight or www.abiscraft.com.au
Fiskars Trimmer
Fiskars Scissors
Card-stock in brown and white (if using copic markers to colour use bleed proof card-stock)
Sizzix texture plate in brick pattern and a die cutting machine to run it through
Lawn fawn stamps. I have used critters in the burbs,critters in the forest,banneriffic, lunar lights,critters in the snow and fanciful frames.you can get them from www.lawnfawn.com (yes! I am loving lawn fawn at the moment!)
Copic markers to colour
memento tuxedo black in pad.
glue,glitter and glossy accents.
First step. Cut Your card to square 15cm x 30cm, score at the 15cm line to create your square card.

On the inside of your card pencil in lines at 7.5cm vertical and horizontal. This is your guide to cut your window evenly.

Start in the bottom right section of your card to create your first window. Use the guide lines on the Fiskars everywhere punch to get your square lined up with your pencil lines.use the 1st line in on the guide so when you cut there will be a gap. this will create the 'cross' section in the window.

Your first square is cut.

Turn the card upside down to put the cut square in the top left section. From now on we will be cutting the squares in a clockwise order.I have found by doing this i can get the squares the most even as you have the cut square on the left to use as a guide for the next punch.
Do the same as the step above. line up your square and punch.

Turn your card to make the last punched square to the top left section again and then follow the above steps and cut the 3rd square.

Finally turn your card again to make the last punched square to the top left and punch the final square.
You now have your window. If you are not 100 % give it a few goes on paper first to get the knack.

Here is your window card.

Next place your card into the brick texture folder and run through your die cutting machine. I had to do this twice to get the whole card embossed.

Once embossed trim off any card from the top or bottom that has not been embossed. i had to trim about 1/2 cm off the bottom to tidy the card up.


Glue or double side tape the white card-stock into the inside of the card. Once you have done this close the card and with a pencil trace around where the window holes are. This will help you place your stamped images in the best position for maximum effect when the card is closed.

Stamp your images into the card. Ensure when the card is closed that you can see the important parts of the stamp to give the"looking through the window" effect. I have gone with lawn fawn stamps to create a Christmas theme. I really wanted to do an open fire with the Xmas tree but i cannot seem to get lawn fawn cozy Xmas stamps ANYWHERE!!! Never mind I did the best with what I had.


And there you have it... The finished card. Just like you were looking in on a cold Christmas night!
The Fiskars Everywhere Punch starter set comes with the square punch included. you can also get circle,scalloped square and scalloped circle as separate shapes. These extra shapes are interchangeable with your starter set. When i get my little hands on the other shapes i will put up some more tutorials for you using the different shapes.

Subscribe to:
Posts (Atom)


